
 When I bought my first camera, I had absolutely no idea what I was doing. I left my camera in the pre-set Auto mode, and just let my camera do all the thinking for me. What I didn’t realize was that I could control every single aspect of my images, and get them nearly perfect in camera if I just took my education one step further.
Today I’m going to focus on a thing called Manual mode, which is a setting on your camera that lets you control E V E R Y T H I N G. Manual mode isn’t scary by any means, but it does take a bit of understanding to grasp the concepts. In order to fully utilize Manual mode, you have to understand three main things: ISO, aperture, and shutter speed, better known as the “Exposure Triangle.” Basically, the exposure triangle is the group of settings that determines the overall look and brightness or darkness of an image. With that being said, it’s pretty important to have a grasp of the exposure triangle so you’re able to control the images you’re taking, rather than letting your camera make the decisions. With every picture you take, you’ll have to change each of these settings to get your desired look, so it’s good to know how changing one of these settings affects the other!
As I’ve stated in previous posts, I’m fully self-taught. Thankfully, I had some photographer friends, mentors, and free YouTube videos along the way to help with the basics! I’m going to try and explain each concept in the simplest terms so it’s not too overwhelming, however, I encourage you to do further research into Manual if you’re interested!
Each setting (ISO, aperture, and shutter speed) has pros and cons, or tradeoffs that will happen, as you raise and lower them, so I’ll discuss those too!
ISO: ISO is known as the camera sensor’s sensitivity to light. Reading that you’re probably like “what the heck does that even mean….?” No worries! Think of it this way, if you’re outside on a sunny day, you have a TON of access to natural light, so you don’t want your camera to be too sensitive to the light, or your image is going to be blown out (overexposed, too bright). When I’m outside during a portrait session, my normal ISO range is about 100-4oo on a typical day, and I’ll raise it as it starts to get darker if need be. When you’re inside and don’t have a lot of access to natural light, you raise your ISO since you need your camera to be more sensitive to the limited light you have available.
-Pros of ISO: If you have a lot of natural light available and are able to use a low ISO, that gives you a ton of wiggle room for the other settings, and makes your images more pleasing to the eye!
-Cons of ISO: If you don’t have a ton of natural light available, you’ll need to bump your ISO up to essentially brighten your image. Different cameras have different ISOs that are safe to shoot at. For starter models like Canon rebels, I probably wouldn’t even shoot over ISO 800. The tradeoff with shooting at a higher ISO is that as you raise your ISO, your image starts to show digital noise, or grain. If you’ve ever taken a picture on your iPhone in a dark setting and tried to brighten it, you’ll see a ton of little white dots start to appear everywhere–that’s noise!
Aperture: I discussed aperture a little in my previous post about purchasing a new camera or lens for Christmas, so hopefully you’re a little familiar with it by now! Aperture relates to the size of the opening of a part of the lens. Aperture affects the blurriness between the subject and the background, also known as bokeh. Aperture is measure by F-stops. If I’m shooting 1-2 people, my F-stop is usually around 2.0-2.2, however, the more people I add into the group, the higher I raise my F-stop. This allows for a higher depth of field, letting me get more people in focus.
-Pros of aperture: The lowest I normally go for my aperture is about F 2.0-2.2. This is great for portraits since it allows for my subjects to be in focus, and creates a blurry background!
-Cons of aperture: If your aperture is too low, less of your subject will be in focus, which might cause for only a part of your subject’s face to be in focus, or maybe a few people from the entire group to be in focus. If your aperture is too high when it doesn’t need to be, you’re letting in less light, and won’t have as blurred of a background.
Shutter Speed: Shutter Speed refers to how long the shutter is opened, which determines how much light the sensor is exposed to. If my subject is still, or I’m just shooting standard portraits, my shutter speed doesn’t need to be too fast since my subject is mostly stationary. However, if I’m photographing a moving subject, I’ll raise my shutter speed to account for the movement and speed needed to capture them. The shutter speed is measure in 1/xyz seconds. The more your subject is moving, the higher you want the “xyz” number to be, so like 1/800th of a second, etc. If your subject is stationary, you can shoot at slower shutter speeds. This relates to light because the faster your shutter is, the less time it’s open, which means the less light is let in and vice versa.
-Pros of shutter speed: If I’m able to have a higher shutter speed, that reduces the chance that the image will show “camera shake” from my hands.
-Cons of shutter speed: If I don’t have a lot of natural light available, I have to lower my shutter speed to let in more light. If my shutter speed is too low though, that gives room for my camera to catch camera shake, resulting in images that are not as sharp.
-To compensate for both ends, I try not to go lower than a shutter speed of maybe 1/200! Most people say a good rule of thumb is doubling your lens type to get the lowest your shutter speed should be (so if I’m shooting with my 100 mm lens, the lowest others suggest I go is 1/200 of a second).
When determining my settings for an image, I’ll typically set my aperture first. Since I keep my aperture between 2.0-2.8 most days, I feel like aperture has the least effect on lighting for me personally. Also, since I like to maintain a consistent style when it comes to the bokeh/blurriness of the background, I like to keep my aperture at a lower F-stop.
Here’s a few examples from different sessions and weddings to see my settings and decisions I make when approaching different times of day, amounts of people, and lighting situations! As a side note, each image, with the exception of the sparkler portrait from Adaly and Zach’s wedding, was taken with my 50 mm!  With senior sessions I only have one subject, so my Aperture tends to be around 1.8 to 2.2, with the highest being 2.8 if I want to insure a super sharp image. In this picture, my ISO was 250 since I had a lot of natural light coming in! Because of the access to natural light, I was able to keep my ISO, shutter speed, and aperture at preferable rates!
Solution: For this location we had great lighting, so I didn’t need to adjust any of my settings just to access more light.
 In this image, the biggest factor on harnessing light was my ISO and lowered shutter speed since it was about 10 PM at night. Flash was used as well!
Solution: You’ll notice my ISO was 1250 because of the lack of available light, so my trade-off was having to lower my shutter speed to the lowest I was comfortable with in order to let in more light.
 In this image, I had a lot of light leaking in from the right side of the frame, as well as a lot of available sunlight since it was mid-day. So we have an image with a lot of light, movement, and a large group.
Solution: I kept my ISO low since there was tons of available light, I bumped my aperture to 2.8 to account for the amount of people in the image, and I set my shutter speed to 1/800 to capture the movement without any blur.

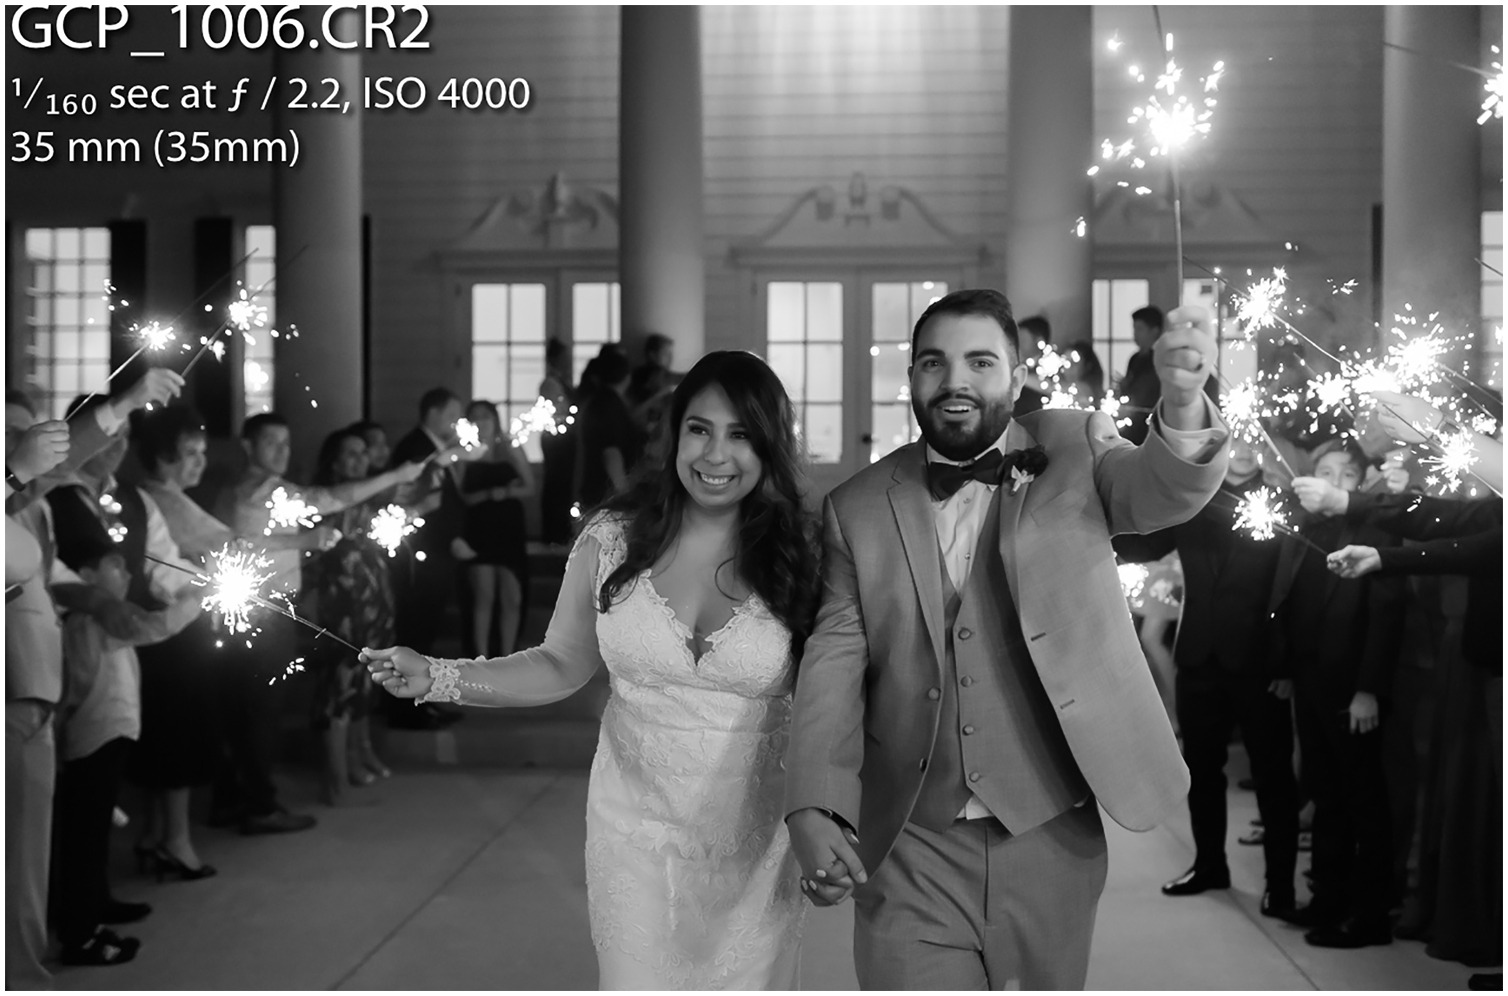 Sparkler images are some of my favorites! In these two pictures from Adaly and Zach’s wedding day, you can see my raised ISO due to it being dark out!
Solution: Since it was darker, I bumped my ISO to 4000. I have a Canon Mark IV and they handle higher ISOs pretty well without showing grain, so I was totally okay with raising my ISO to that level! In the top image I lowered my aperture to 1.6 and my shutter was 1/100 so that I could bring in more light from the two sparklers giving us light, however, in the bottom image I raised it to 2.2 with a shutter speed of 1/160 since we had more sparklers, and thus more light. Lowering my shutter speed and aperture kept me from having to raise my ISO any more.
 Ahh, one of my favorites from Jordan and Alex’s wedding day!! So in this image, we have a group, a lot of natural light, and no movement!
Solution: I raised my aperture to 3.2 to get everyone in focus. My ISO is at 160 since it was already bright outside! My shutter speed is at 1/400–there’s no movement in this image, however, I always like to keep my shutter as high as I can without having to raise my ISO or lower my aperture.
 In this image, I have some of my most preferred settings for mid-day shooting! In this image I’m working with lots of natural light, a cute bride and groom, and no movement.
Solution: Since I was shooting just the bride and groom, I was able to shoot at an aperture of 2.2. I always like to set my aperture in place first with portraits since the overall blurriness of the background isn’t something I want to compromise! My ISO is 160 since I have a lot of natural light, and my shutter speed is 1/1000 since I didn’t need to let in too much light. I was able to keep my ISO low and my shutter speed high due to the natural lighting!
Well, that’s all I’ve got for today! I know that was an absolute ton of words, but I hope you find it helpful as you approach shooting in Manual mode! Trust me, it’s not as scary as it sounds, and once you understand the reasoning behind why you’re making changes to your settings, you’ll be able to make them quickly! If you have any questions at all about the information above, feel free to ask below in the comments–I’m more than happy to help! Thanks so much for reading through, can’t wait for next week’s post!

Looking for the perfect camera still? No worries, I got you!!


")


